Maven项目打包

Maven项目打包的方式有多种,我常用的就是使用assembly的方式进行打包。

1 首先需要在pom项目中加入如下依赖

1
2
3
4
5
6
7
8
9
10
11
12
13
14
15
16
17
18
19
20
21
22
23
24
25
26
27
28
29
30
    ...
<build>
<plugins>
<plugin>
<groupId>org.apache.maven.plugins</groupId>
<artifactId>maven-compiler-plugin</artifactId>
<version>3.2</version>
<configuration>
<source>8</source>
<target>8</target>
</configuration>
</plugin>
<plugin>
<!-- see http://davidb.github.com/scala-maven-plugin -->
<groupId>net.alchim31.maven</groupId>
<artifactId>scala-maven-plugin</artifactId>
<version>3.1.3</version>
</plugin>
<plugin>
<artifactId>maven-assembly-plugin</artifactId>
<configuration>
<descriptorRefs>
<descriptorRef>jar-with-dependencies</descriptorRef>
</descriptorRefs>
</configuration>
</plugin>
</plugins>
</build>

</project>

2 使用如下命令进行编译打包

1
mvn assembly:assembly

Nginx日志输出cookie的值

一 输出全部cookie的信息

1
2
3
4
5
log_format data_log '$remote_addr - $remote_user [$time_local] '
'"$request" $status $body_bytes_sent '
'"$http_referer" "$http_user_agent" $cookie_C_I $http_x_forwarded_for'
'"$http_cookie"'
'"$upstream_addr" "$upstream_status" "$upstream_response_time" "$request_time" ';

通过$http_cookie就可以将请求的全部cookie获得。

二 输出单个cookie

输出单个cookie也很简单,只需要为cookie key加上$cookie_前缀就可以了,例如有一个cookie的key为_tracker_user_id_,那么在nginx中可以通过$cookie__tracker_user_id_就可以获取到了。

1
2
3
4
5
log_format data_log '$remote_addr - $remote_user [$time_local] '
'"$request" $status $body_bytes_sent '
'"$http_referer" "$http_user_agent" $cookie_C_I $http_x_forwarded_for'
'"$cookie__tracker_user_id_"'
'"$upstream_addr" "$upstream_status" "$upstream_response_time" "$request_time"';

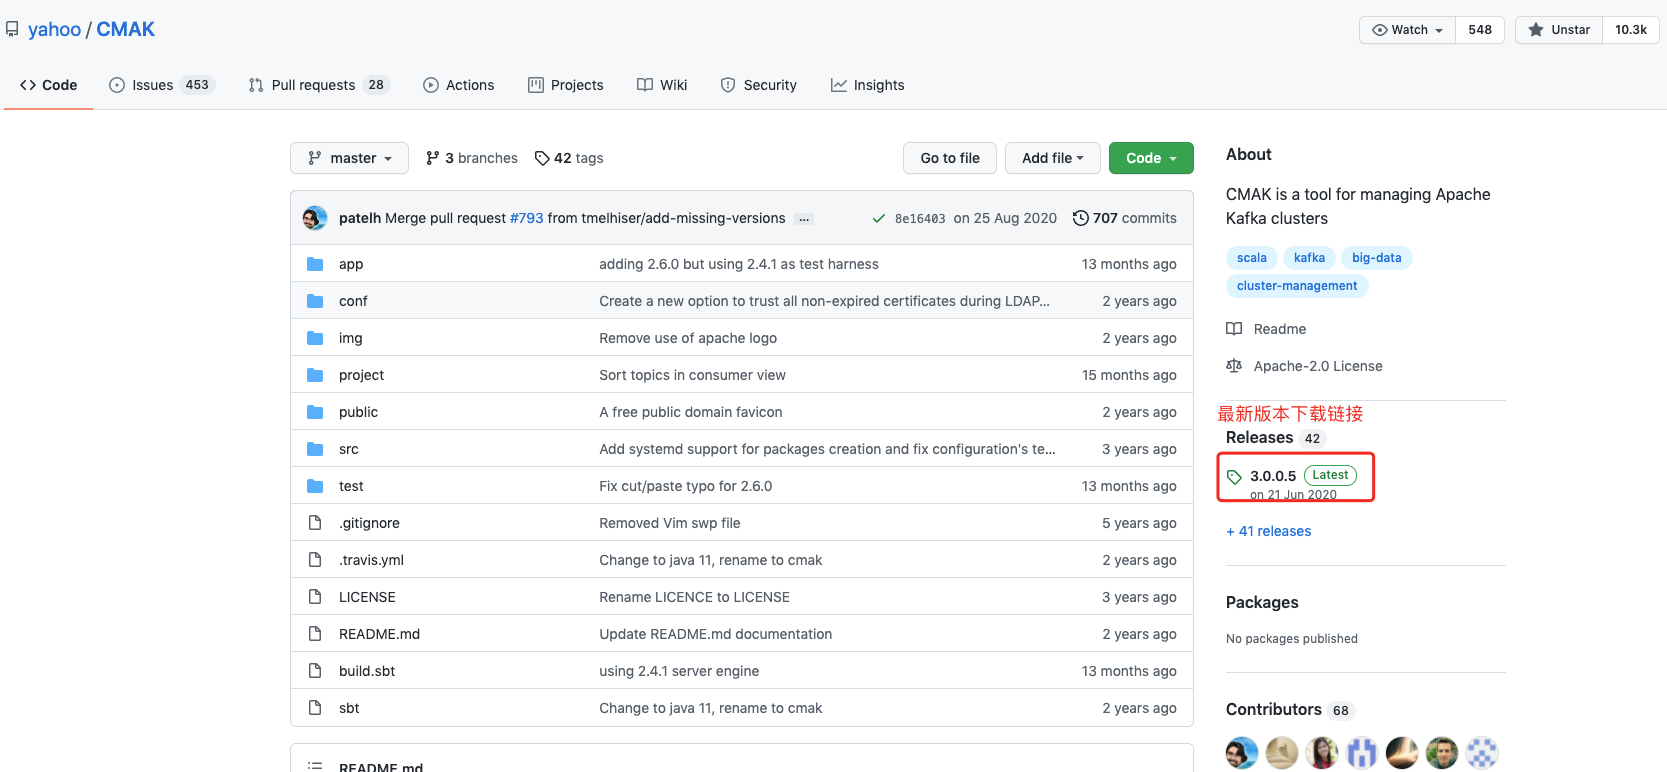
Kafka Cmake(原kafka Manager)的使用

lastest_version

下载压缩包

wget https://github.com/yahoo/CMAK/releases/download/3.0.0.5/cmak-3.0.0.5.zip

解压cmak

unzip cmak-3.0.0.5.zip

修改conf/application.conf

cmak.zkhosts=”hadoop101.eqxiu.com:2181” 改为真实的zk地址

下载open jdk11

wget https://download.java.net/openjdk/jdk11/ri/openjdk-11+28_linux-x64_bin.tar.gz

解压 open jdk11

tar -zxvf openjdk-11+28_linux-x64_bin.tar.gz

修改bin/cmak启动脚本

在文件的最上边加上JAVA_HOME的路径,比如:

1
JAVA_HOME=/data/software/jdk-11

启动cmak

1
./bin/cmak -Dhttp.port=10010

在浏览器上访问

1
http://your-ip-address:10010

参考
https://github.com/yahoo/CMAK
https://cloud.tencent.com/developer/article/1651137

如何使用Python连接hive

安装依赖

1
2
3
4
pip install sasl
pip install thrift
pip install thrift-sasl
pip install PyHive

python脚本示例

1
2
3
4
5
6
7
8
9
10
11
12
13
14
15

from pyhive import hive

HOST="127.0.0.1"
PORT=10000
USERNAME="hadoop"
DATABASE="default"

conn=hive.Connection(host=HOST, port=PORT, username=USERNAME,database=DATABASE)

cursor = conn.cursor()
#cursor.execute("INSERT INTO TABLE test_out(name,count,time) SELECT name,count(1),to_date(time) FROM test GROUP BY name,to_date(time)")
cursor.execute("SELECT * FROM test")
for result in cursor.fetchall():
print(result[2])

参考 https://segmentfault.com/a/1190000022358127

自定义Tornado请求日志格式

请求日志中有很多的404 HEAD请求,为了将这部分日志过滤掉,修改了一下tornado请求日志的逻辑。
代码如下:

自定义请求日志的处理逻辑

1
2
3
4
5
6
7
8
9
10
11
12
13
14
15
16
17
18
19
# 日志消息格式
def log_request(handler):
if handler.get_status() < 400:
log_method = tornado.web.access_log.info
elif handler.get_status() < 500:
log_method = tornado.web.access_log.info
else:
log_method = tornado.web.access_log.info
request_time = 1000.0 * handler.request.request_time()

request_status = handler.get_status()
request_method = handler.request.method

# log_method("HH status={} method={}".format(request_status, request_method ))
if request_status == 404 and request_method == 'HEAD':
#不输出日志
pass
else:
log_method("%s|%d|%s|%.2f|%s",datetime.datetime.now(), request_status , handler._request_summary(), request_time, handler.request.headers.get("User-Agent", ""))

设置为Application.settings的log_function属性

1
app.settings["log_function"] = log_request

最后输出的日志格式:

输出的日志格式

参考 https://blog.wencan.org/2017/02/07/tornado-log-format/

Nginx根据参数转发

首先明确一点:Nginx的location不能否匹配到问号后的参数。参考https://www.zhihu.com/question/50190510

所以通过在location中的if条件来进行逻辑判断

1
2
3
4
5
6
7
8
9
10
location /p.gif {
if ($args ~ "getip") {
add_header Content-Type "text/plain;charset=utf-8";
return 200 '$proxy_add_x_forwarded_for';
}
proxy_pass http://big-da/log-server/push;
proxy_set_header Host $host;
proxy_set_header X-Real-IP $remote_addr;
proxy_set_header X-Forwarded-For $proxy_add_x_forwarded_for;
}

url匹配规则 参考https://www.cnblogs.com/woshimrf/p/nginx-config-location.html

1
2
3
4
5
6
7
8
location [=|~|~*|^~|@] /uri/ {
...
}
= : 表示精确匹配后面的url
~ : 表示正则匹配,但是区分大小写
~* : 正则匹配,不区分大小写
^~ : 表示普通字符匹配,如果该选项匹配,只匹配该选项,不匹配别的选项,一般用来匹配目录
@ : "@" 定义一个命名的 location,使用在内部定向时,例如 error_page

Linux Grep命令的使用

作为linux中最为常用的三大文本(awk,sed,grep)处理工具之一,掌握好其用法是很有必要的。

1、首先谈一下grep命令的常用格式为:grep [选项] ”模式“ [文件]

grep家族总共有三个:grep,egrep,fgrep。

常用选项:

1
2
3
4
5
6
7
8
9
10
11
  -E :开启扩展(Extend)的正则表达式。
  -i :忽略大小写(ignore case)。
  -v :反过来(invert),只打印没有匹配的,而匹配的反而不打印。
  -n :显示行号
  -w :被匹配的文本只能是单词,而不能是单词中的某一部分,如文本中有liker,而我搜寻的只是like,就可以使用-w选项来避免匹配liker
  -c :显示总共有多少行被匹配到了,而不是显示被匹配到的内容,注意如果同时使用-cv选项是显示有多少行没有被匹配到。
  -o :只显示被模式匹配到的字符串。
  --color :将匹配到的内容以颜色高亮显示。
  -A n:显示匹配到的字符串所在的行及其后n行,after
  -B n:显示匹配到的字符串所在的行及其前n行,before
  -C n:显示匹配到的字符串所在的行及其前后各n行,context

upload successful

Read More

腾讯云COS文档的一些基本操作

本文只是对腾讯云COS文档的基本操作做了简单的介绍,具体的更详细的内容参考腾讯云官方链接

其实还有一点,腾讯云文档中可能也有一些错误的地方,本文中对其做了调整。比如下边代码中的region,应该是ap-加上地域的拼音,但是文档中给的却是COS_REGION,容易让人误解。

安装SDK依赖,其他安装方式见腾讯云官方链接

1
pip install -U cos-python-sdk-v5

1
2
3
4
5
6
7
8
9
10
11
12
13
14
15
16
17
18
19
20
21
22
23
24
25
26
27
28
29
30
31
32
33
34
35
36
37
38
39
40
41
42
43
44
45
46
47
48
49
50
51
52
53
54
55
56
57
58
59
60
61
62
63
64
65
66
67
68
69
70
71
72
73
74
75
76
77
78
79
80
81
82
83
84
85
# -*- coding=utf-8
#参考 https://cloud.tencent.com/document/product/436/12269

# appid 已在配置中移除,请在参数 Bucket 中带上 appid。Bucket 由 BucketName-APPID 组成
# 1. 设置用户配置, 包括 secretId,secretKey 以及 Region
from qcloud_cos import CosConfig
from qcloud_cos import CosS3Client
import sys
import logging
logging.basicConfig(level=logging.INFO, stream=sys.stdout)

client = None
new_bucket='test123-125313601'

default_bucket = "test-125313601"
secret_id = 'AKID1qPhjUyB6nEOHuGL8JKDrFMvEG3Z' # 替换为用户的 secretId(登录访问管理控制台获取)
secret_key = 'HGyPaT5RWR7XhbEKDLF7yZuy' # 替换为用户的 secretKey(登录访问管理控制台获取)
region = 'ap-beijing' # 替换为用户的 Region ,腾讯云"存储痛管理"中的"所属地区"中为中文,在这里需要改写为拼音的形式,并且使用ap-前缀
token = None # 使用临时密钥需要传入 Token,默认为空,可不填
scheme = 'https' # 指定使用 http/https 协议来访问 COS,默认为 https,可不填

def init():
global client
config = CosConfig(Region=region, SecretId=secret_id, SecretKey=secret_key, Token=token, Scheme=scheme)
# 2. 获取客户端对象
client = CosS3Client(config)

init()

def create_bucket():
print("创建存储桶")
response = client.create_bucket(
Bucket=new_bucket
)
print(response)


def upload_file():
print("上传文件")
with open('/Users/bill/Desktop/23.png', 'rb') as fp:
response = client.put_object(
Bucket=default_bucket,
Body=fp,
Key='desktop.jpg',
StorageClass='STANDARD',
EnableMD5=False
)
print(response['ETag'])


#查询存储桶列表
def look_buckets():
print("查询存储桶列表")
response = client.list_buckets()
print(response)
buckets = response['Buckets']['Bucket']
#遍历对象列表
for bucket in buckets:
response = client.list_objects(
Bucket=bucket['Name'],
Prefix=''
)
print(response)


def download_object(bucket,local_path):
print("获取文件到本地")
response = client.get_object(
Bucket=bucket,
Key='desktop.jpg',
)
response['Body'].get_stream_to_file(local_path)


def delete_object(bucket,filename):
# 删除object
response = client.delete_object(
Bucket=bucket,
Key=filename
)
print("已经将腾讯上的{}/{}删除".format(bucket,filename))


# download_object(default_bucket,'/Users/bill/Desktop/img_downloaded2.jpg')
# delete_object(default_bucket,'icon2.png')

查看腾讯云COS中的appid、Secretld、SecretKey、所属地域

1 所属地区

腾讯云”存储痛管理”中的”所属地区”中为中文,在程序里可能需要改写为拼音的大写形式
所属地区
比如

1
2
3
4
5
6
7
8
9
10
11
12
13
14
15
16
17
# -*- coding=utf-8
# appid 已在配置中移除,请在参数 Bucket 中带上 appid。Bucket 由 BucketName-APPID 组成
# 1. 设置用户配置, 包括 secretId,secretKey 以及 Region
from qcloud_cos import CosConfig
from qcloud_cos import CosS3Client
import sys
import logging
logging.basicConfig(level=logging.INFO, stream=sys.stdout)
secret_id = 'dsddOHuGL8fwwCFDFSMvEG3Z' # 替换为用户的 secretId(登录访问管理控制台获取)
secret_key = 'xxxEZfU2JL8etrYy7yZuy' # 替换为用户的 secretKey(登录访问管理控制台获取)
region = 'ap-beijing' # 替换为用户的 Region ,腾讯云"存储痛管理"中的"所属地区"中为中文,在这里需要改写为拼音的形式,并且使用ap-前缀
token = None # 使用临时密钥需要传入 Token,默认为空,可不填
scheme = 'https' # 指定使用 http/https 协议来访问 COS,默认为 https,可不填
config = CosConfig(Region=region, SecretId=secret_id, SecretKey=secret_key, Token=token, Scheme=scheme)
# 2. 获取客户端对象
client = CosS3Client(config)
# 参照下文的描述。或者参照 Demo 程序,详见 https://github.com/tencentyun/cos-python-sdk-v5/blob/master/qcloud_cos/demo.py

2 查看秘钥

查看秘钥

Read More

HTML热图技术调研

heatmap.js

有一种比较成熟的热图技术heatmap.js,通过不同的颜色来标记不同位置(页面上的坐标点)的访问频率,但是不能够标识出页面上某个元素,比如链接,图片的点击次数。
官网地址https://www.patrick-wied.at/static/heatmapjs/
git地址https://github.com/pa7/heatmap.js
使用demo参考 https://blog.csdn.net/Jermyo/article/details/110561098

事件监听

给当前页面的window对象添加一个事件监听器。
在用户点击的时候,上报被点击元素的信息(主要包括url和element path等)。
在展示的时候,计算每个节点的点击PV和UV,并通过元素outline的宽度展示元素的点击量,当鼠标移动到某个元素上时,会出现tip提示框,显示具体的PV和UV数据。

1
2
3
window.addEventListener("click", function(e){
console.log(e.target.tagName);
});

参考 https://segmentfault.com/q/1010000005686667